Continuing from the first part in this series about the renovation journey of the Orchard Cottage, there's a theme of removing the previously busy interior look, and each day literally consisted of being covered head-to-toe in plaster dust and paint. So as well as the laborious task of stripping back the wallpaper and replacing the patterned surrounds with muted paint tones, there were the intensely dark painted window frames and ceiling trims to update. One of my best friends through this process became white undercoat and while we were definitely budget conscious throughout the renovations I did experiment with a few different paint brands. In the end I found the Accent brand stocked at Mitre 10 to not only be cost effective, but I was really happy with the finish of all the products I used.
I simply couldn't bare the prospect of sanding off all that dark colour before repainting (and suspected there would be numerous more paint layers hiding beneath) so I went straight in with the white undercoat. It took two layers before the topcoat was applied but it worked. I knew I wanted to use a neutral palette and ended up staying with two base colours throughout. I took these from the NZ Resene colour range, the colours are 'Concrete' and 'Quarter Concrete'.
It becomes a true journey, taking the blank canvas and bit by bit, building the layers toward the end result. Poking around second hand and op shops has always been a favourite past time so with this project it was super exciting to stumble across items that could work in the space. The living area is the biggest room in the Cottage and as mentioned in the first post, I was planning to do a white washed effect on the floors so felt the need to introduce another shade in this room to avoid it feeling too stark and cool. The pair of comfy conversation chairs below were a fabulous find and after white washing the wooden frames, their original upholstery also became the inspiration for the lower wall colour - Resene 'Longitude'.
Where possible we did try to reuse or reinvent whatever we could. The light fittings were one element that, in their original state with wooden and brass detailing (sorry no close-up before photos of the lights) would normally have been sent straight to the op shop. But pretty much every room was fitted with a version of this style so we gave them a clean up, sprayed them in a coat of white and now, it feels that even the floral beige and brown shades seem to work!

So, it was on to the floors and yes, I did take to Pinterest and various inspirational DIY blogs that describe many different methods for painting timber floors to produce an authentically aged white washed effect. They often talked of specialty products, methods including sanding, priming and using a number of different coats of paint (lighter, then darker accents, then lighter again etc.) to achieve 'the look'. Knowing myself not to be particularly patient at the best of times I felt frustrated and irritable just by reading through the many-stepped processes.
I did however, originally start with sanding because the floors were varnished and this is the one step I thought I should really follow. But the belt sander and I never truly bonded and after being swept across the floor a few times ending up with elbows scraping the timber boards, or the machine completely jumping out of my hands and bashing the walls with force, I tossed it aside not far into the process.
I started eyeing up the trusted 10L pot of white undercoat again and I'm sure many a professional decorator would cringe, but this is exactly what I used on the floor. Yep, a few coats of undercoat straight on to the varnish. Then it was out with the sandpaper, I randomly roughed up the edges of the floor boards, accentuating knots and imperfections as I went. I did this by hand so I had more control than with the little power sander I used on the walls. So there was no top coat colour, just the white undercoat until I got the distressed, shabby look I was after. The whole lot was then sealed with two coats of clear polyurethane for floors. The photo below was taken once the final coat had dried and yes, that is a very sweet tasting celebratory glass of wine in the frame!

I'm pretty sure I've read that it's an interior design mistake to use 'actual white' as a paint colour but I think because the soft 'Concrete' tones predominantly cover the walls, I can admit to extending my use of the reliable Accent undercoat. I 'white washed' the vintage furniture finds we picked up along the way, the kitchenette cupboards, shelving and whatever else I thought needed a similar finish. Everything got the same 'roughed-up' sandpaper treatment and a good protective coat of clear polyurethane.
So a year on, I can report that in general the finish on the floors, furniture and surfaces has held up well. Due to the dark stain previously on the floor, over time there are definitely patches where this has leeched through slightly creating a ruddy appearance in places. Personally I'm not concerned, in fact I think it just adds to the character and the 'not perfect' nature of things. In addition, it now also carries it's own subtle scars of wear and tear for all to see. A few scuffs here and there and the odd chink in it's white armor are celebrated when we show guests around letting them know that they should feel relaxed, that shoes inside are OK.
Continuing the theme of finding pre-loved and vintage style furniture, up-cycling and reviving any character pieces that were already on the property, we got a really good white washed finish on the corner storage cupboard that was originally attached to the kitchenette. It has an excellent grainy texture that meant a very light sanding bought out all the wood detail.
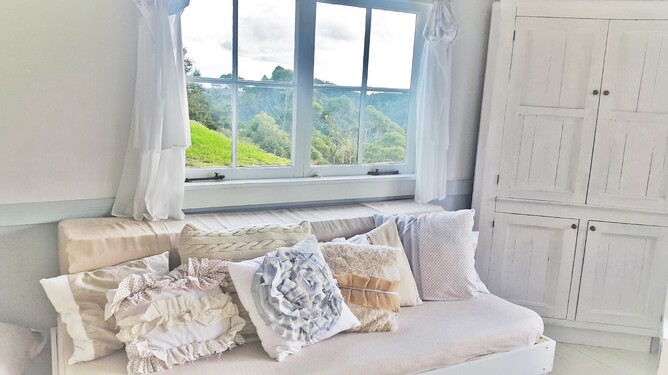
I always had a vision of daybeds in the lounge, with plenty of cushions and extra cosy blankets on hand for those afternoon naps that are a rite of passage when you're enjoying a retreat from the world. They were obviously meant to be as we discovered some solid hand-crafted bunk beds in the little bush hut that sits amongst the trees part way down our bush track. Once dismantled to get them out the door and transport them up to the Cottage, we realised we had two unique and perfectly good daybed bases. Just a few minor adjustments by our resident handyman, a light slap of the trusted white undercoat, and they were ready to receive good quality mattresses for sitting and sleeping comfort.
The finishing of the daybeds, crafting and covering the generous back rests and adorning them with plenty of interesting 'shabby style' cushions also marked a departure from the paint pots. Instead I was taking up regular extended sessions behind my little domestic sewing machine.Next, in the last of these reno reflections I'll share how I delved into the creative genius of others and conjured up my own versions of the simple, sometimes offbeat but always practical and functional finishing touches.
The finishing of the daybeds, crafting and covering the generous back rests and adorning them with plenty of interesting 'shabby style' cushions also marked a departure from the paint pots. Instead I was taking up regular extended sessions behind my little domestic sewing machine.Next, in the last of these reno reflections I'll share how I delved into the creative genius of others and conjured up my own versions of the simple, sometimes offbeat but always practical and functional finishing touches.