I remember sitting cross legged on the bed we'd constructed in the back of our white Toyota Hiace Vanette. Parked up on a free camping beach spot somewhere down south, it was the first real purchase we'd made together, with grand plans of summer roadies. Joe impressed with his skills, creating the ultimate little camper and furnished with all the essentials, 'Maisy Motel' (as she was nicknamed) was perfect for carefree adventures, taking us the length of the country.
This evening, tumblers of wine in hand as the sun sank beyond the horizon, we lit up talking about how one day we'd have a sprawling piece of land and enjoy the spoils of a sustainable lifestyle. Our urban way of life at the time allowed for a few house plants and a small potted herb garden on the terrace of our apartment. We got totally carried away and designed the ultimate 'metro style, kitset, self watering vege garden'. Scribbled on bits of paper, we were sure we'd nailed the next big thing - it could be called "APLANTment" we announced triumphantly!
We've seen similar concepts pop up in lifestyle magazines and gardening centres since but we're pretty sure ours was a superior concept. With apartment living now a distant memory and our sprawling land an absolute reality, we were recently faced with a challenge that we weren't expecting. In a previous post I mentioned that, thanks to Joe's green fingers we've always had some homegrown veges to pluck from the garden. And while we're inundated with a huge array of fruit trees here, it took us almost a year to establish our first vegetables. There's a number of reasons for this. Firstly, the renovations took all our initial energy and attention, then, as we surveyed the land for somewhere practical to establish a patch we soon came to the realisation that unless we were prepared to sacrifice one of the lovely flower beds at the entry of our cottage, in favour of a less pretty but more practical edible patch, we would be looking at trucking in trailer loads of topsoil for a kitchen garden in a less conspicuous spot.
With budgets tightened, we started looking at alternative options and on one of our regular family trips to the city library (yes, we actually visit the library, a bit retro I know but we're all about it!) we picked up a book on straw bale gardening. It didn't take much reading before we decided to try for ourselves. According to the book, there was a long list of advantages over traditional raised soil beds; no construction required to house the soil, less watering required, no weeds and best of all for us, no pricey topsoil required.
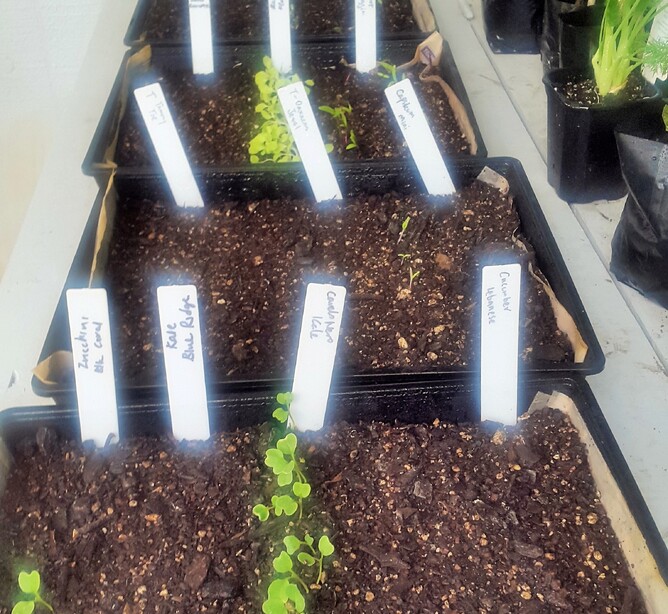
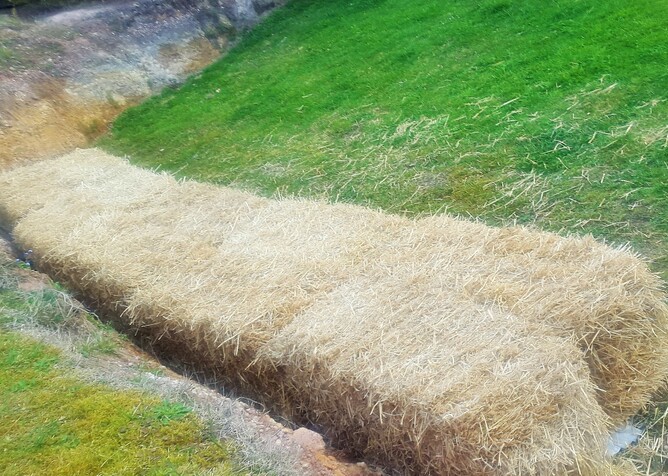
So our preparations took place, as we normally would, gently sewing tiny seeds in trays of seed raising mix and then daily watering to help their germination. Then the search for straw bales, now there are a couple of schools of thought in regard to the bales, our book specified straw bales rather than hay but I have since read a number of articles recommending hay over straw. Hay is very easy to come by in NZ so we may give this a go next time but we did managed to track down some good straw bales for just $6 each.
So ten standard, firmly packed bales was enough to get us underway. Once placed in the chosen spot, the bales need to be 'conditioned' before seeds or seedlings are added. This is simply a process of sprinkling generously with a balanced fertiliser and watering in. Over a few weeks this process is repeated during which time we used a cooking thermometer (one with a long prong) to track the internal heat of the bales.
So ten standard, firmly packed bales was enough to get us underway. Once placed in the chosen spot, the bales need to be 'conditioned' before seeds or seedlings are added. This is simply a process of sprinkling generously with a balanced fertiliser and watering in. Over a few weeks this process is repeated during which time we used a cooking thermometer (one with a long prong) to track the internal heat of the bales.
While there's nothing really to notice visually changing with the bales, the gradual rise in temperature is quite amazing. Essentially, you're looking for a steady increase (ours reached a maximum of 69 degrees celsius!), then a steady decrease. When the bales reach ambient temperature, they're ready to plant. The book estimated this will take about 2 weeks, it did state that this can vary and in the end, it was almost four weeks until ours had cooled to a satisfactory level. As it turned out, this was pretty much perfect timing as our seedlings had popped their heads up and were starting to gain some strength.
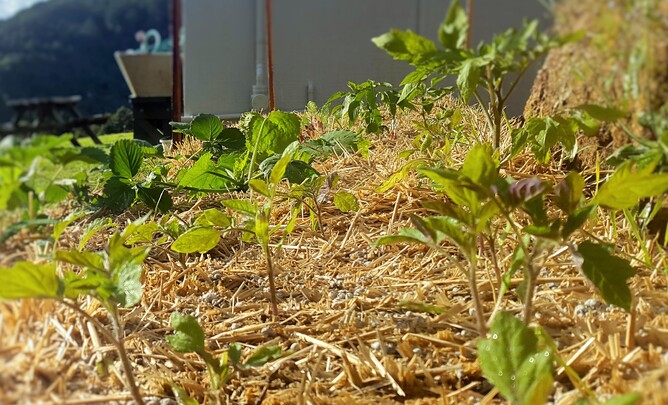
By the time the conditioning is complete, the bales are very moist, they retain water really well but it's also almost impossible to over water. Making narrow holes, seedlings can be popped straight into the bales, apparently you can sew seeds directly as well. We did try with some carrot seed but I think we were defeated due it being a particularly hot stretch of days, so they probably needed a little more nurturing than our once-a-day water to survive. Once the seedlings were in, it was just a regular light watering and before long we had a flourishing patch.

Reflections on our First Attempt
- It's super easy! Apart from the first bit of preparation, there's only regular watering to think about, no weeds - what a bonus!
- Everything we planted grew big, healthy and juicy (apart from our failed carrot seeds).
- From one bale on a city balcony (who needs APLANTment!) to many, we think this is the answer for anyone wanting their own vege patch. Especially if you're confined on space, not sure you have the right spot for a more permanent structure or, like us, you're looking at a decent investment for a good structure filled with quality soil.
- It's versatile, once we see the last of our summer crops, the remaining straw will make perfect mulch around our fruit trees and other garden beds. If we want, we can change the layout and location next season simply by placing the bales in a different way.
Notes for Next Time
- We'll get our stakes and climbing structures in place before planting tomatoes, beans and other climbing plants. Preparing to support tall, healthy plants and the big juicy fruit that will come.
- We'll be more aware of overcrowding. While weeds are not a problem, we still need to keep an eye out for crawling critters. When plants get crowded, there's plenty of places for them to hide.
- We'll probably increase the number of bales and change our layout next time to increase access from more sides and plan for consecutive cropping, so we can keep the garden productive all year round.
- We'll try sewing seeds directly again, this time making sure they get the water and shade they need to germinate and mature.
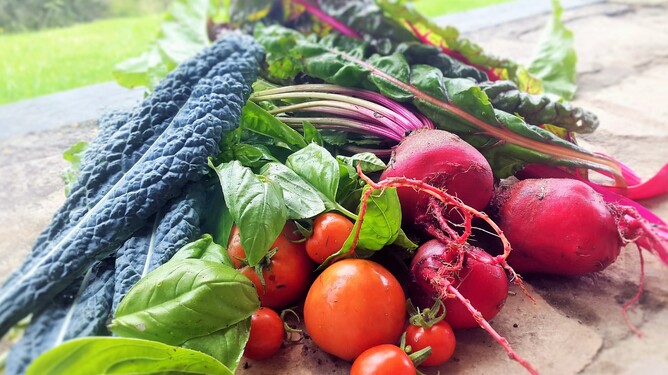
So if you've ever wondered about straw or hay bale gardening or you've been putting off getting your first vege garden started, I definitely recommend you give this a go. By all accounts, it's pretty hard to go wrong and don't you love the idea of no weeding and barely having to wash your freshly plucked beetroot, celery, lettuce, capsicum, spinach, kale... oh the list just goes on and on.... Go on, give it a go!