I don't know if it's naivety, creative thinking or just the way my brain is wired which defaults to a kind of 'why not?' response when ideas spring to mind. I'm sure it's not that unique but the results seem to spark a sort of intrigue and surprise from others. Whether it's people quizzing wide-eyed about our move from the metro-cool of Wellington to Whangarei with no existing friend networks, no real knowledge of the area or what to expect when we got here. Or when visitors want to know the story of how the distinctive look came together for the Orchard Cottage, with all it's eclectic elements that collectively seem to have a quiet comforting influence like the embrace of a good friend.
The effect of the Cottage is not lost on me either. Quite often, as I fluff cushions or place a fresh garden-picked bouquet on the table ready for the next guests, I just want to accept her embrace, stretch out on a light-filled daybed with a cup of tea and a good book to escape.
While the renovation and finishing touches are an obvious reference, I'm under no illusion that a large part of the magic that touches people when they stay here is more about the 'Terroir', the place, the environment and the intangible sense of arriving somewhere special. And that, we certainly did not create, we can only claim to recognizing it and are doing what we can to respect, honour and enhance it.
The location is rural not remote, just a short drive to town and a few minutes from a thriving community. Neighbours are relatively close but not within sight and yet for some reason, even when I'm tapping away on the computer then gazing across the vast sweeping valley of textured treetops I too feel a million miles from anywhere.
The style of the Orchard Cottage has been the subject of many animated conversations with guests though. The project was a huge amount of fun - albeit, sometimes a messy, dusty, frustrating and exhausting kind of fun. The fact that our guests often specifically book to stay at the Cottage because of how she comes across in photos is really rewarding for me. So I thought I'd share some of the journey in a short series of posts for anyone who's interested...

I'll happily admit that I'm a sucker for a good before and after DIY reno. Guilty pleasure comes when settling in for the 'reveal' episodes of those reality renovation shows. For some reason emotion overcomes me, a lump building in my throat as the last few seconds count down (and so much is apparently achievable; hanging a door, making a bed and painting the last of the skirting boards - really? Oh the magic of TV!). They finally collapse into each others arms, near tears, sweaty and spent in an unrecognisable room to what they walked into four days before, it's no wonder the ratings are great.
So taking on these two little cottages held a certain sense romantic excitement for me, luckily we purchased 'good bones' so apart from a few minor layout changes most of the work was cosmetic. But this also meant the job was pretty much all mine.
So taking on these two little cottages held a certain sense romantic excitement for me, luckily we purchased 'good bones' so apart from a few minor layout changes most of the work was cosmetic. But this also meant the job was pretty much all mine.
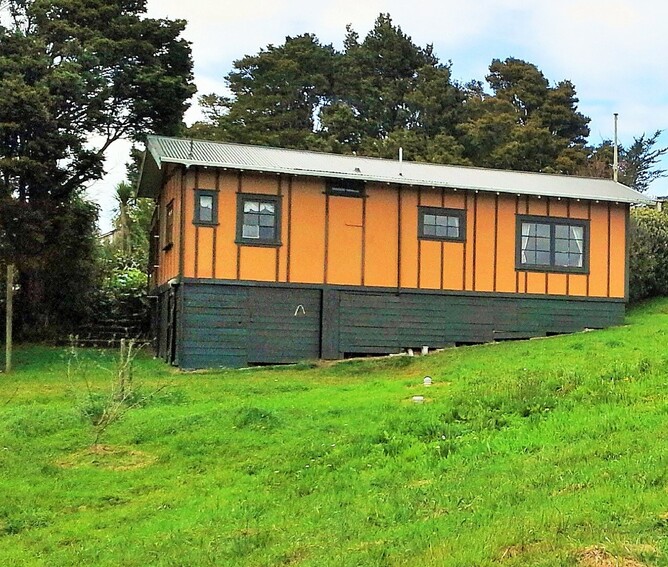
The ink had barely dried on the sale and purchase agreement before I popped the lid on a big pot of exterior paint and began a swift colour change to most of the outside cladding. The photo above was taken standing amongst the young fruit trees that the Orchard Cottage overlooks when we first moved in. While the original choice of colour was certainly unique, as soon as I saw the property and in the weeks that followed of negotiating the deal, my mind was in a frenzy of the things we would do to make it our own. Immediately I visualised a soft grey replacing the bold orange and being such a dramatic change with instant gratification, I wasted no time and finished the job as quickly as my arms would paint.
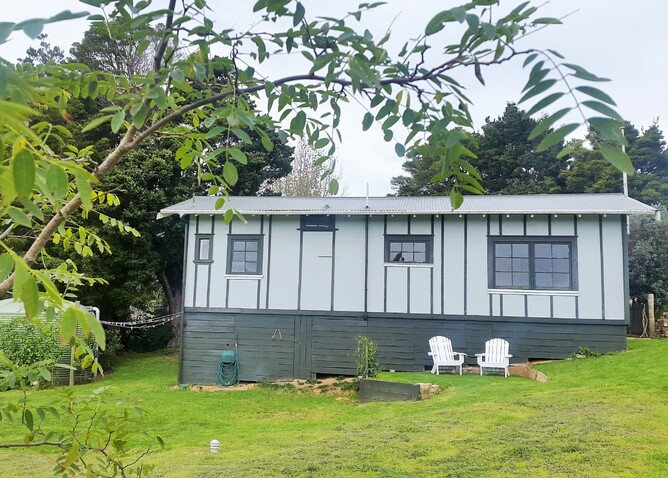
While the landscaping continues to be a work in progress and the contrasting dark green remains at this stage, it does seem to work better with the environment. I have recently however, been thinking of a return to the paint pots, and maybe replacing the green with white trims so the whole cottage is lighter. A fiddly job with so many French windows and doors (some frames are also in need of TLC before any colour change will be possible), this is exactly the reason I initially didn't change it at the outset so maybe I'll ponder a little longer...
While the landscaping continues to be a work in progress and the contrasting dark green remains at this stage, it does seem to work better with the environment. I have recently however, been thinking of a return to the paint pots, and maybe replacing the green with white trims so the whole cottage is lighter. A fiddly job with so many French windows and doors (some frames are also in need of TLC before any colour change will be possible), this is exactly the reason I initially didn't change it at the outset so maybe I'll ponder a little longer...
Once the exteriors of both cottages had a quick makeover, the focus was firmly set on the Orchard Cottage interior and you can get the idea from the photos below of the previous look, colour scheme and detail that has since been replaced. The Cottage originally started life as the Whangarei Croquet Clubrooms and was transported to this site by the previous owners. Positioned perfectly to enjoy the view over the orchard, the valley beyond and to bask in the warm afternoon sun.
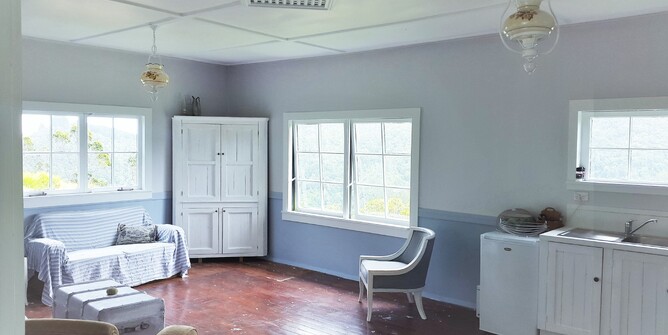
In my mind, the character of the building lent itself to a 'shabby chic ' style. I had discovered Rachel Ashwell a few years before and really fell for her unlikely mix of distressed finishes and softer sweet patterned or floral furnishings. I have also always adored the effortless style that the French do so well of soft paint tones, or even leaving history exposed and embracing worn or chipped paint. Then pairing this with the luxury of twinkling chandeliers, comfortable linen and delicate details.
This was a chance to create my own version, so throughout the full time job of striping, plastering, scraping and sanding I kept myself sane and the creative juices flowing by forming a slight addiction to Pinterest.
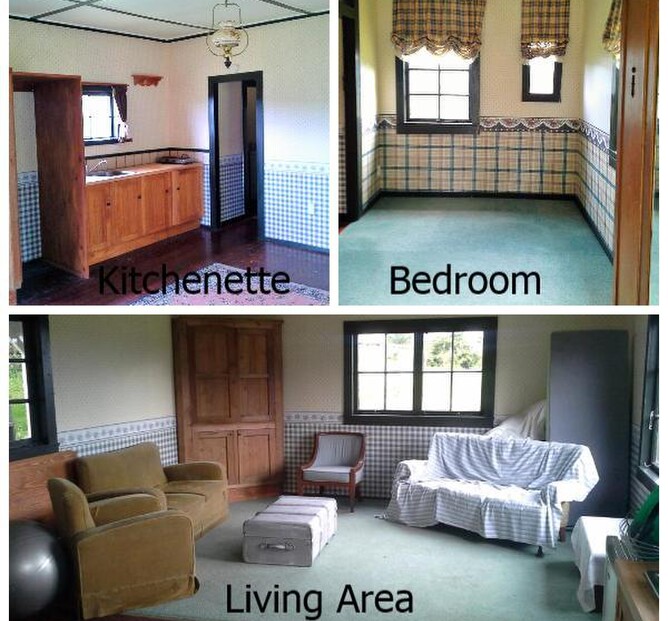
So room by room the renovation began and each area started with the somewhat daunting task of stripping wallpaper. You can see from the 'before' photos, there was a different patterned paper on the bottom to that on the top and a boarder around the middle. While great thought and handmade care had gone into the previous decoration of this cottage, there was A LOT going on in each room and this layered wallpaper, was everywhere.
Due to it's age and layering, I soon discovered there was no option to just smooth over the odd edges and paint on top, each room needed resurfacing.Some parts weren't too hard to remove but others were difficult to say the least. After Googling and trying every method possible, blood, sweat and tears were literally shed. In the end I concocted my own five step method of stripping and prepping the walls ready for painting.
MY FIVE STEP PREPPING METHOD
1. Through trial and error my method started with stripping and my most trusted tools were a window scraper and plastering knife. Sometimes I would be dealing with different types of wallpaper glue which meant the scraper would pick up all the wallpaper AND the first layer of paper on the GIB Board beneath, other times the paper just would not budge. So I got good at quickly moving through this step, conceding that on completion it would look like I had set a team of angry cats loose in the room to have the fight of the century.
2. After stripping I would prepare for a dust storm, kitted with a mask and glasses I would lightly sand over the whole room to remove any shreds of paper and smooth over any big bumps or imperfections that had been hiding under the forgiving wallpaper.
3. Next, and you may think this strange but I painted the whole lot in undercoat. The reason for this, as I once again discovered through trial and error, is that it was impossible to start with a layer of plaster. Inevitably minute bits of paper and dust would get caught in the plaster causing huge streaks when smoothing over with the plastering knife. So the paint acted as a 'fixer' to the stripped layer.
4. After painting it was ready for plaster, covering and smoothing over the previous wallpaper frustration.
5. Then to complete the preparations another dust storm would ensue. A light sand of the plastered corrections, and then once all the rubbish and dust had been cleared and cleaned away, the painting could finally begin!
I cringe even now to think of the days I felt completely defeated by this one task. In itself stretching over days it did almost get the better of me. But it's equally quite funny to think back now at how the prospect of hours of painting ahead could actually bring so much joy!
So the transformation was starting to take shape. I now know after repainting the last couple of houses we've owned, that the final stretch of hard graft is coming to an end when you're down to the floors. There was a lot of timber in the previous look of the Cottage and I do love timber floors. Especially if they're original, I'm usually happy to leave them exposed to enjoy the natural grain, pattern and warmth that the wood provides. But in this case I saw the opportunity to have a go at a white washed effect. The ultimate in a light, fresh finish to a room, and if I'm really honest, I just wanted to have a go.
In the my next blog post I'll let you in on the quick and easy 'cheats' method I ended up using on the Cottage's timber floors, as well as how a lot of the other details ended up coming together. For now though, the reliving of this part of the reno has left me feeling a bit exhausted, I learnt a lot but will never look at wallpaper in quite the same way ever again!
In the my next blog post I'll let you in on the quick and easy 'cheats' method I ended up using on the Cottage's timber floors, as well as how a lot of the other details ended up coming together. For now though, the reliving of this part of the reno has left me feeling a bit exhausted, I learnt a lot but will never look at wallpaper in quite the same way ever again!